Before this: A tour of the interface.
You’re going to prepare your board’s drawing with the measurements the workshop needs and export it as a PDF at 1:1 scale. The drawing only reads: it doesn’t change the .s3dx or the STL.
1. Open the drawing
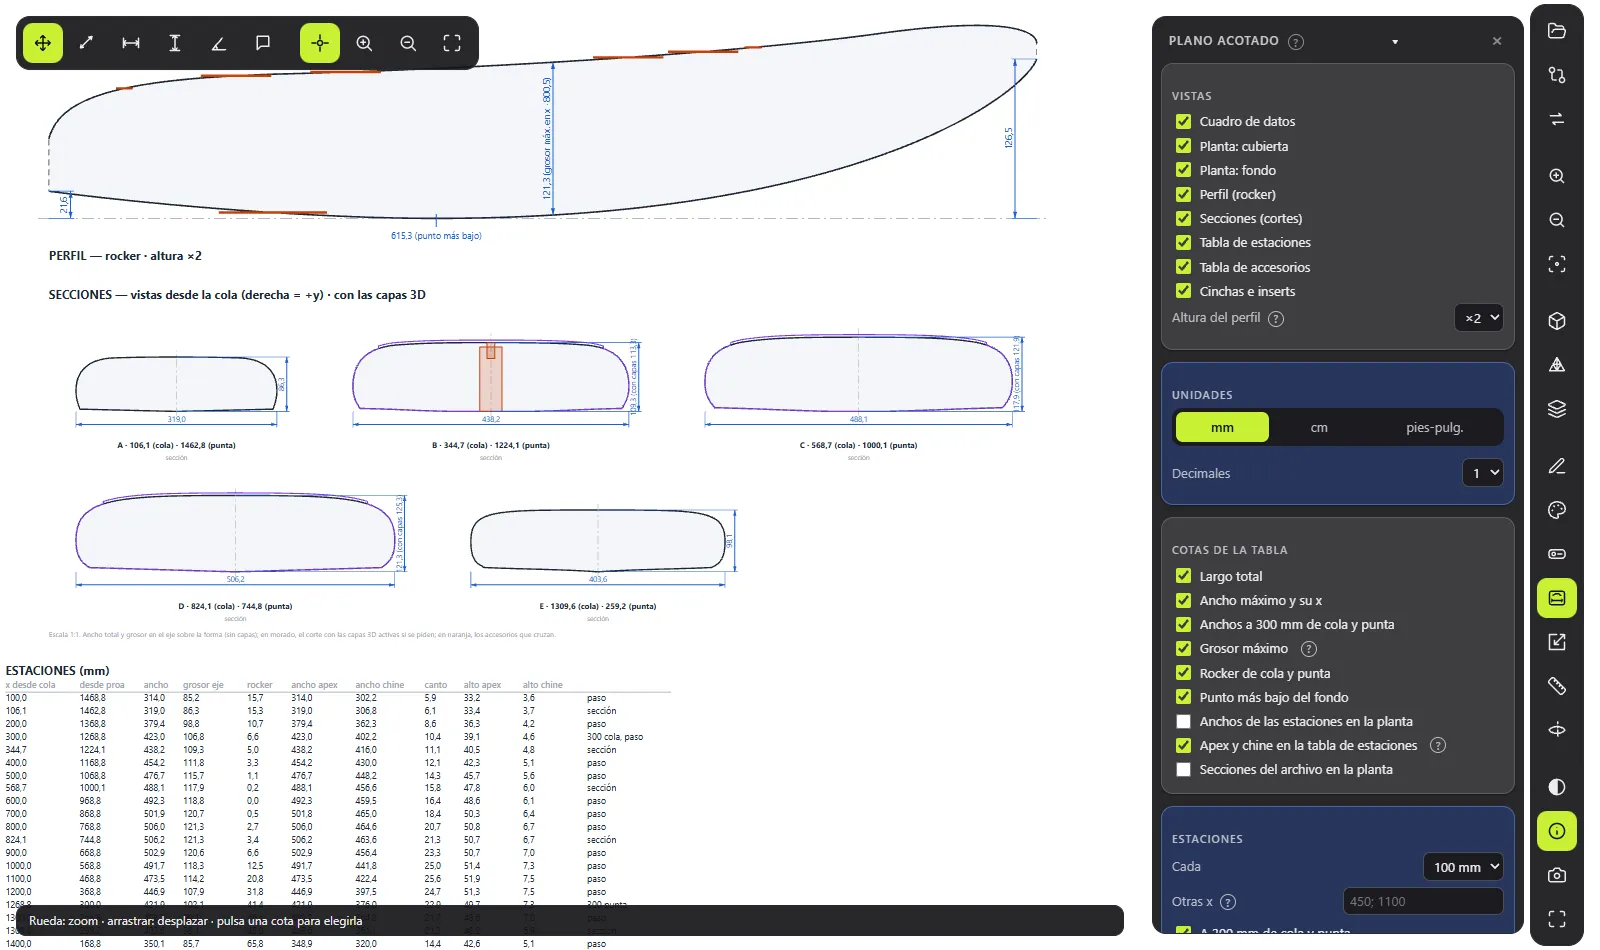
Open the board and press B (or the Dimensioned drawing (B) button). The sheet opens with the DIMENSIONED DRAWING panel on the right.
- With the editor open, the drawing is of the board you’re editing.
- If you have an unsaved rescale, save it first: otherwise the drawing would be of the file, not of what you see.
- With a standalone STL you only get the outline and the profile, with no accessories or layers.
Get around with the wheel (zoom) and by dragging (pan). F fits the sheet.
2. Choose the views
In VIEWS, tick what should go on the sheet:
- Data block: name, file, date, length, width, thickness, rocker and volume.
- Plan: deck and Plan: bottom.
- Profile (rocker). With Profile height (×2, for example) you exaggerate the curve so it’s easier to see. The figures are still the real ones.
- Cross-sections (cuts), Station table, Fitting table and Footstraps and inserts.
3. Choose the units
In UNITS: mm, cm or ft-in. With mm or cm you choose the Decimals; with feet and inches, the Inch fraction.
Tip: for the workshop, mm with one decimal place avoids misreadings.
4. Tick the board dimensions
In BOARD DIMENSIONS: Overall length, Maximum width and its x, Widths 300 mm from tail and nose, Maximum thickness, Tail and nose rocker, Lowest point of the bottom. Apex and chine in the station table adds the width and height of the rail.
5. Add stations
In STATIONS:
- Every: one station every so often, for example every 100 mm.
- Other x: distances from the tail separated by semicolons, for example
450; 1100. Up to 40. - 300 mm from tail and nose and At the sections of the file.
Each station appears in the station table with its width, thickness and rocker.
6. Dimension the accessories
In FITTING DIMENSIONS, choose where to measure from: From tail to the rear edge, From tail to the centre or From nose. Add Distance to the centre line, Spacing of pairs, Size (length × width × depth), Angle (toe) and Distance to the rail.
If you’d rather use the dimensions each accessory carries in its block in the file, click Like the plan sheet in the file. Back to my dimensions undoes that.
7. Add dimensions by hand
In RULER (HAND DIMENSIONS):
- Pick a tool from the bar at the top left (keys 1 to 6).
- Click the points on the drawing. They snap to nodes, outline, centre line, apex, chine and boxes. Hold Alt or press S to stop snapping.
- With Move and select (1) you click a dimension to select it and drag its points. Del deletes it; Ctrl+Z undoes.
Hand dimensions are saved with the board and follow whatever they snapped to if you edit the shape.
8. Check the cross-sections
In CROSS-SECTIONS you choose which cuts to draw: the ones in the file, the stations or any x you type. They’re shown looking from the tail, at 1:1 scale, with their width and their stringer thickness. With With the 3D layers you also see the cut with the pad and the recesses.
9. Export the PDF
In EXPORT, click Save PDF 1:1…. You’ll see “Preparing the PDF…”.
Result: a single-page PDF the size of the sheet, at 1:1 scale (1 unit = 1 mm), with the whole sheet and your hand dimensions.
The PDF needs Microsoft Edge, which comes with Windows. If the program can’t find it, it tells you.
Other outputs:
- Save SVG…: also 1:1, to open in a vector drawing program.
- Save PNG…: to send in a message, at 2000, 4000 or 8000 px wide.
10. Check the scale when printing
Print at 100 %, without “fit to page”. Use a ruler to measure a known dimension, for example the length of a foil box. If it doesn’t match, check your printer settings before you use the drawing to cut.
The drawing settings (views, units, tick boxes) are the same for every board. Hand dimensions belong to each board.